Are you looking for the best way to show different prices per country in WooCommerce? Maybe you want to show a price for the United States and another price for Canada or the rest of the world. In this tutorial, we’ll show you how to geotarget product prices in WooCommerce by showing different product prices by country.
This is useful if you want to sell products at different prices for different countries. Maybe taxes are higher in Canada than they are in the United States. Maybe one country is richer, and you want to maximize profits. Or maybe intercontinental shipping is more expensive that it is when you sell products in your own continent only.
Whatever the case, we know that adding prices per country or continent is IMPOSSIBLE with WooCommerce.
That’s why we’ll show you how to do it with the WooCommerce Product Restrictions by Location plugin.
This plugin allows you to add product restrictions based on the customer’s location. You can restrict products, variations, categories, and coupons by country, state, province, zip code, or using a custom list of locations (store location, for example).
You can download the plugin here:
Download WooCommerce Product Restrictions by Store Location Plugin - or - Read more
After installing and activating the plugin, you need to follow the steps below to set prices by country.
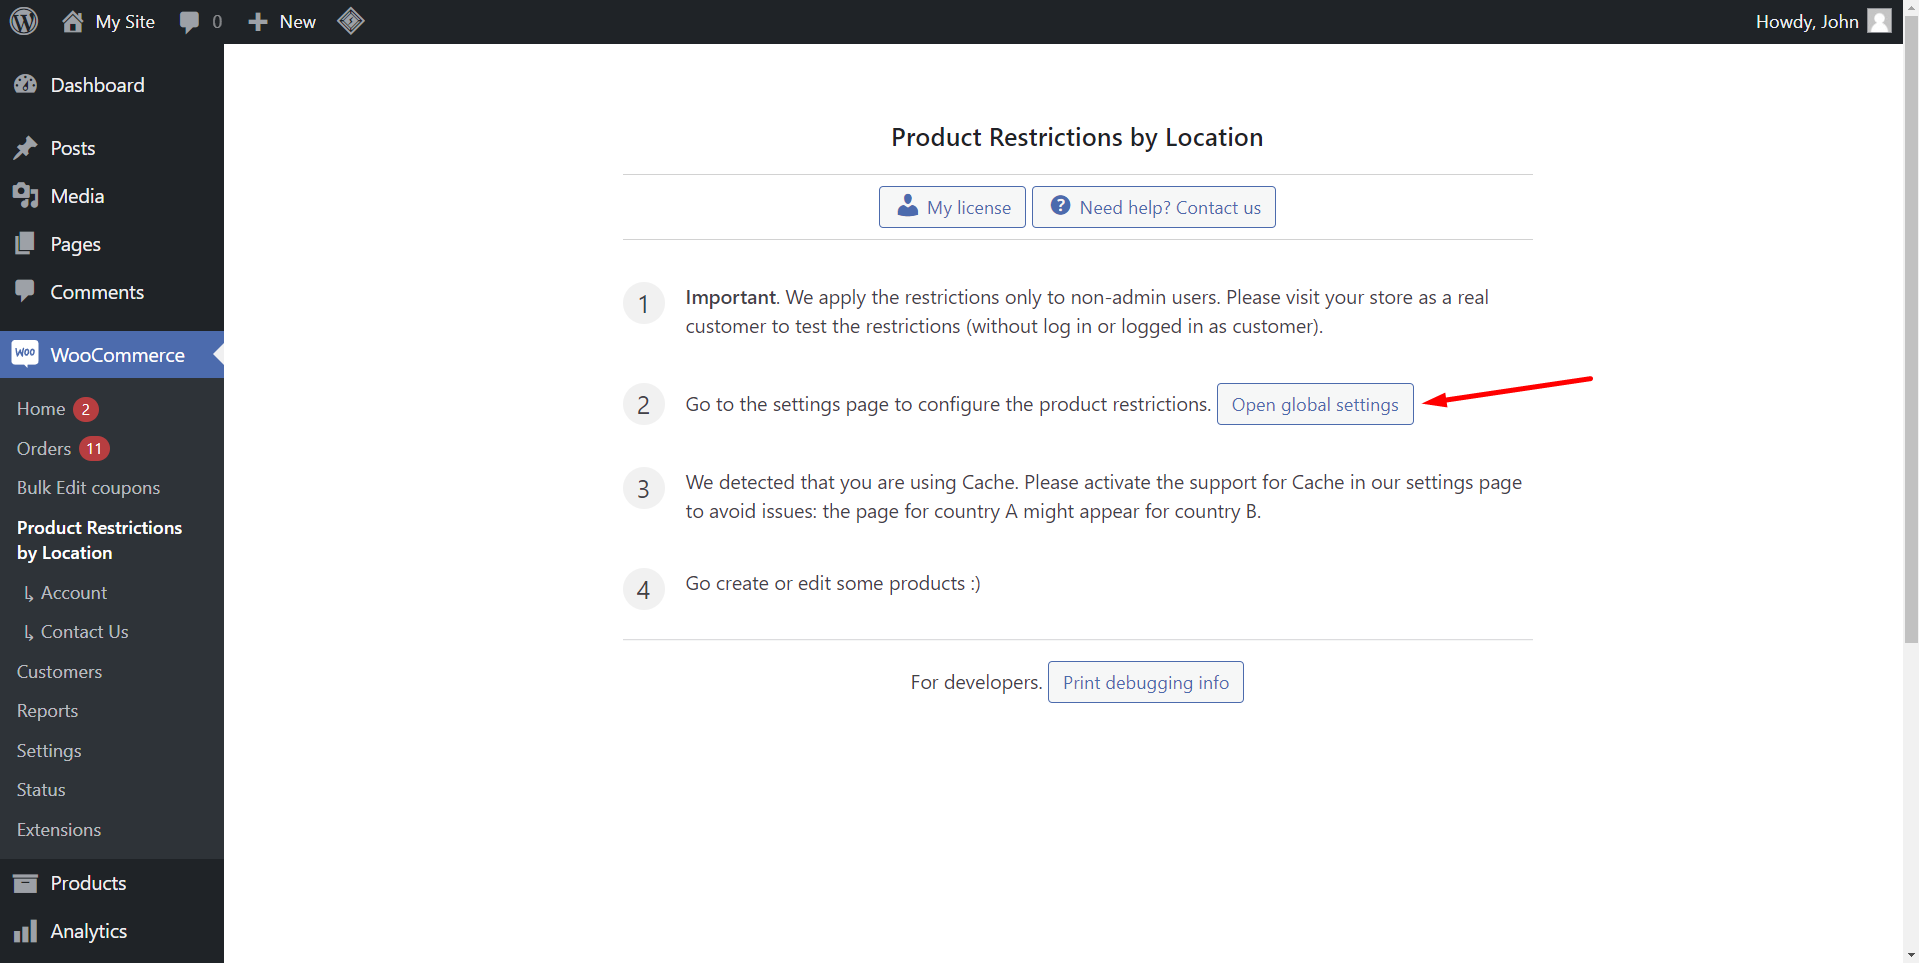
Step 1 – Select the global settings
The first thing we need to do is to set the global settings. In this case, we are going to select what we want to restrict and which restriction method we are going to use.
Go to WooCommerce > Product Restrictions by Location.
Now click on Open global settings.
On the General settings, you need to select these values:
- I want to restrict: Tick the Products and variations checkbox.
- I want to restrict by: Select the Countries/continents option.
- Select the countries you’ll make available for selection. In this example, we will select Canada, Mexico, United States, Central America, and South America.
- Click on Save changes.
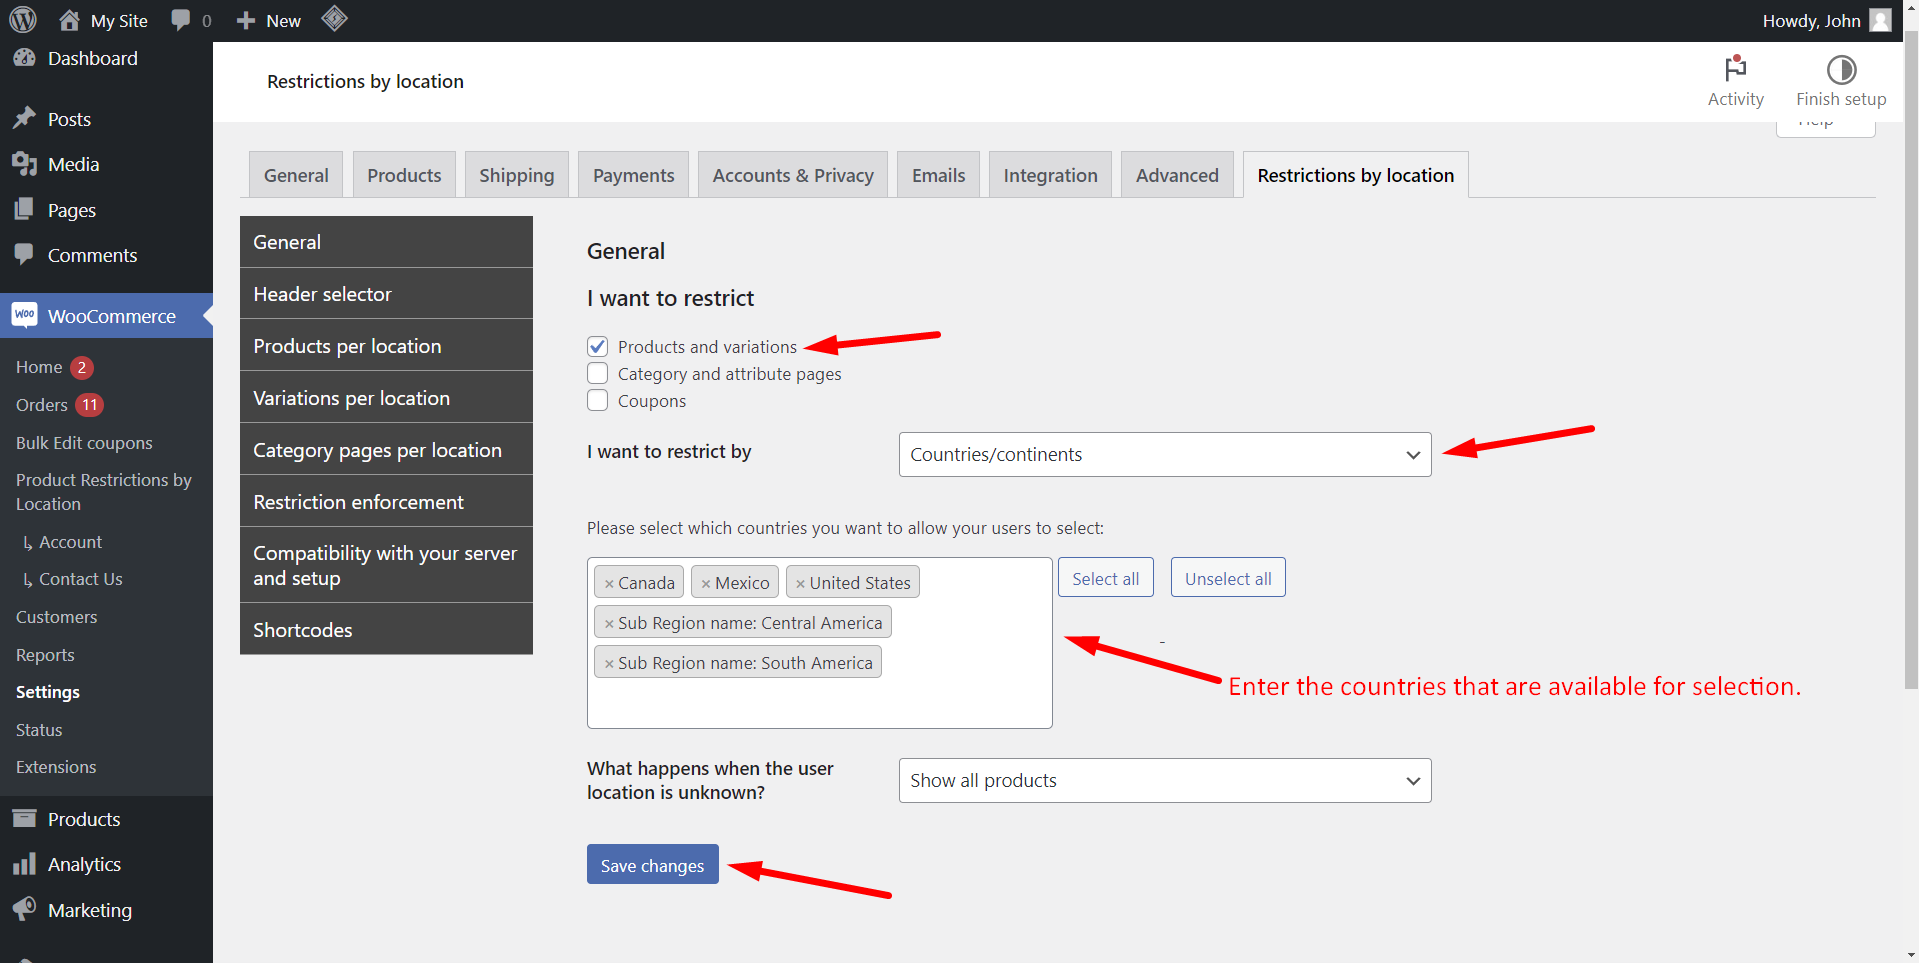
Your customers will have to select any of these options.
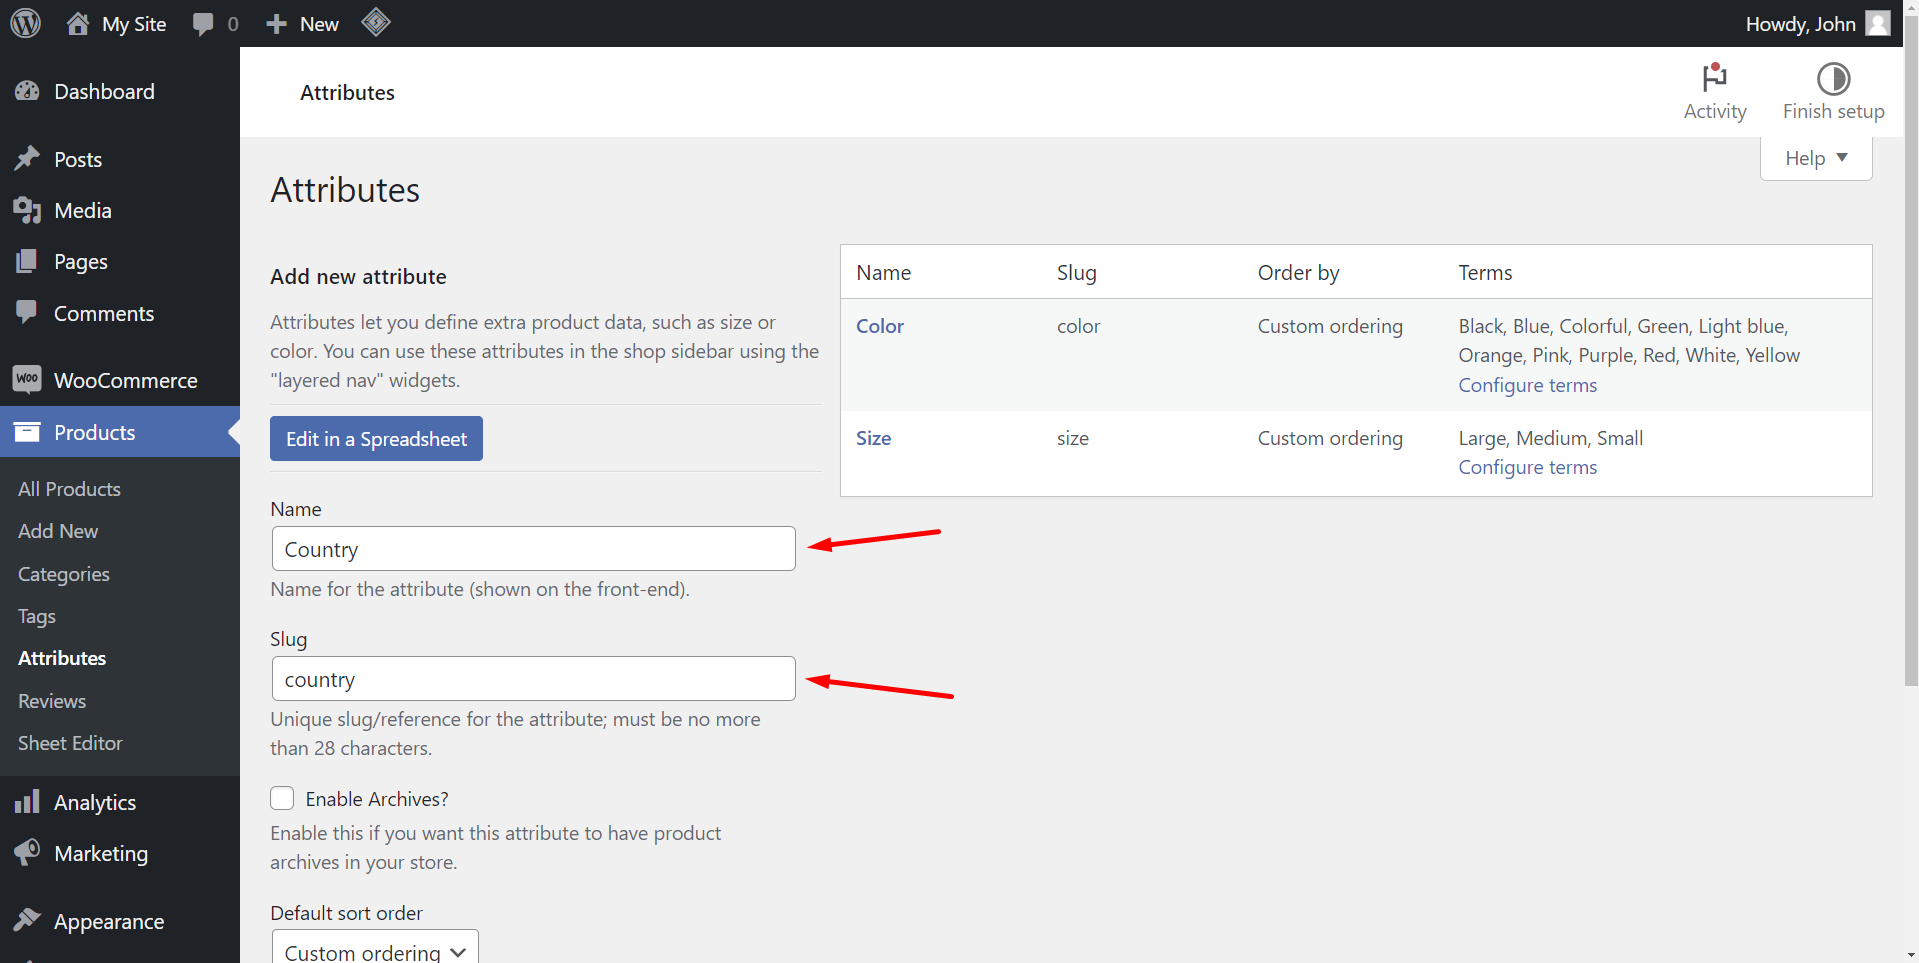
Step 2 – Create country attributes for your products
What we will do to show a different price for each country, continent or subcontinent, is that we will create product variations using an attribute called “Country”.
For this, we need to create a product attribute called “Country”.
Go to Products > Attributes and create an attribute called “Country”.
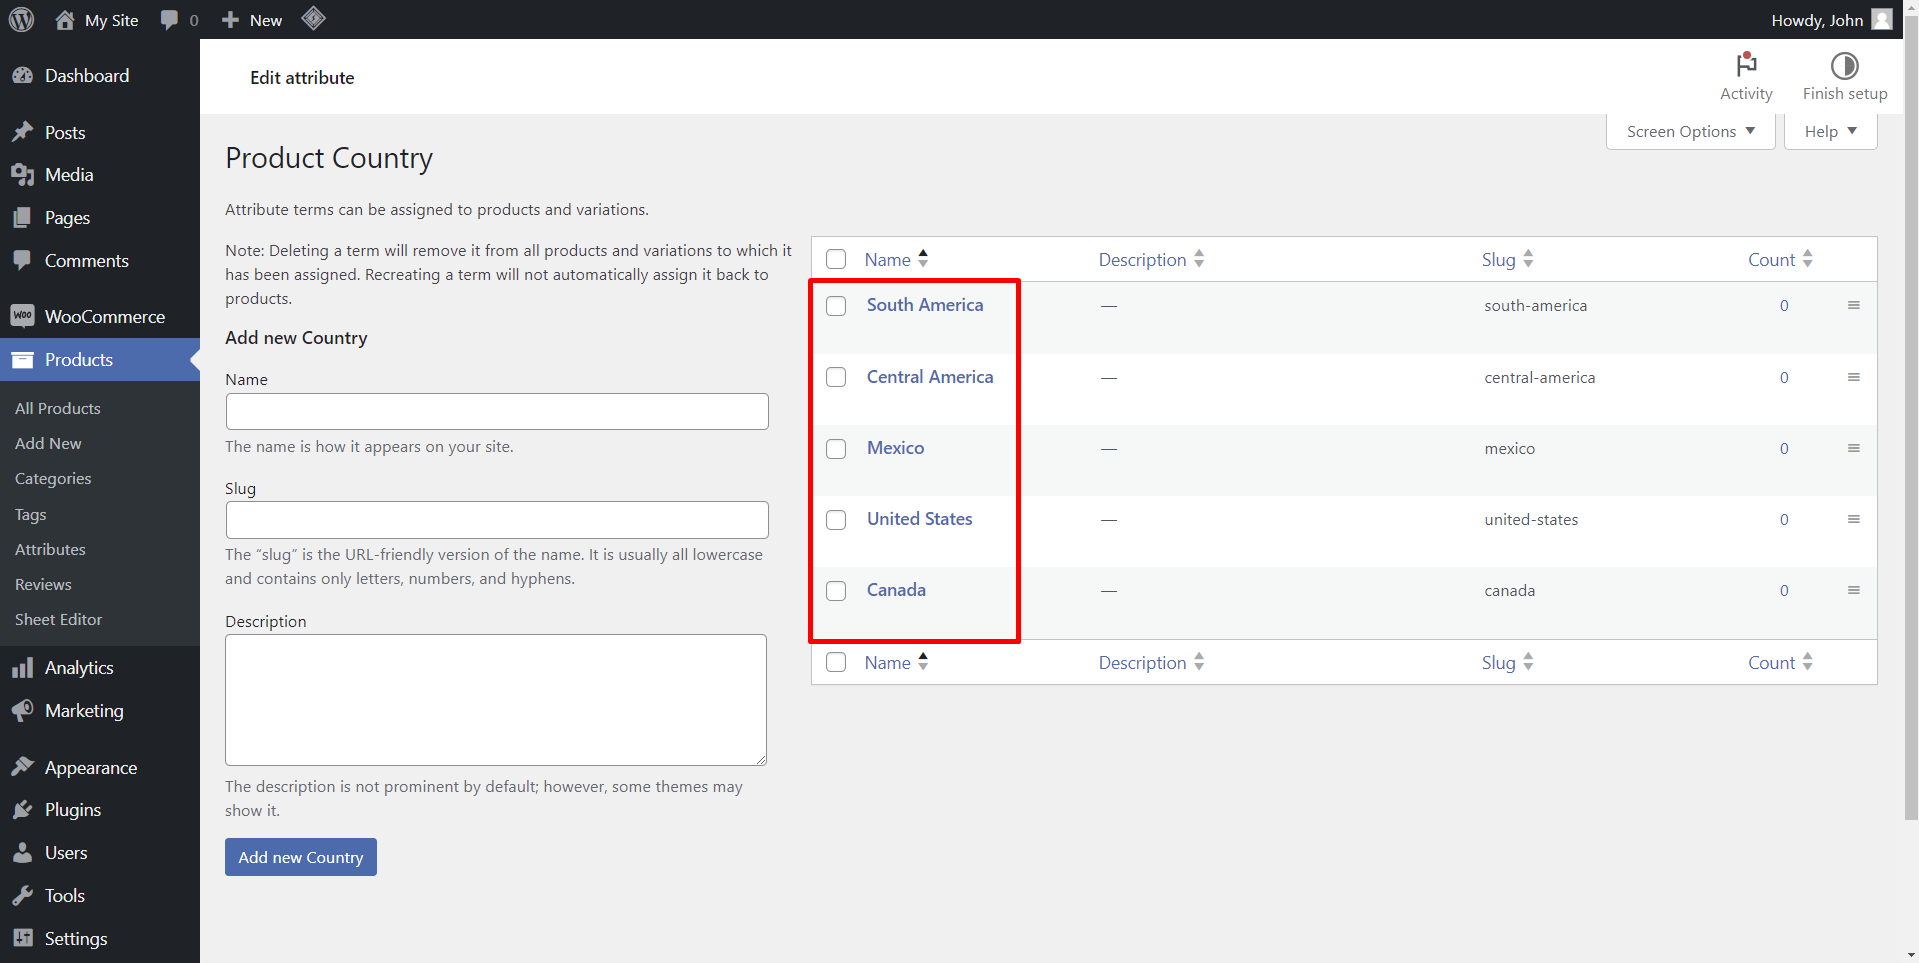
Step 3 – Set up the “Country” attribute terms
We need to create a country term for each country, continent or sub-continent we added in the global settings.
For this, click on Configure terms and start adding the terms.
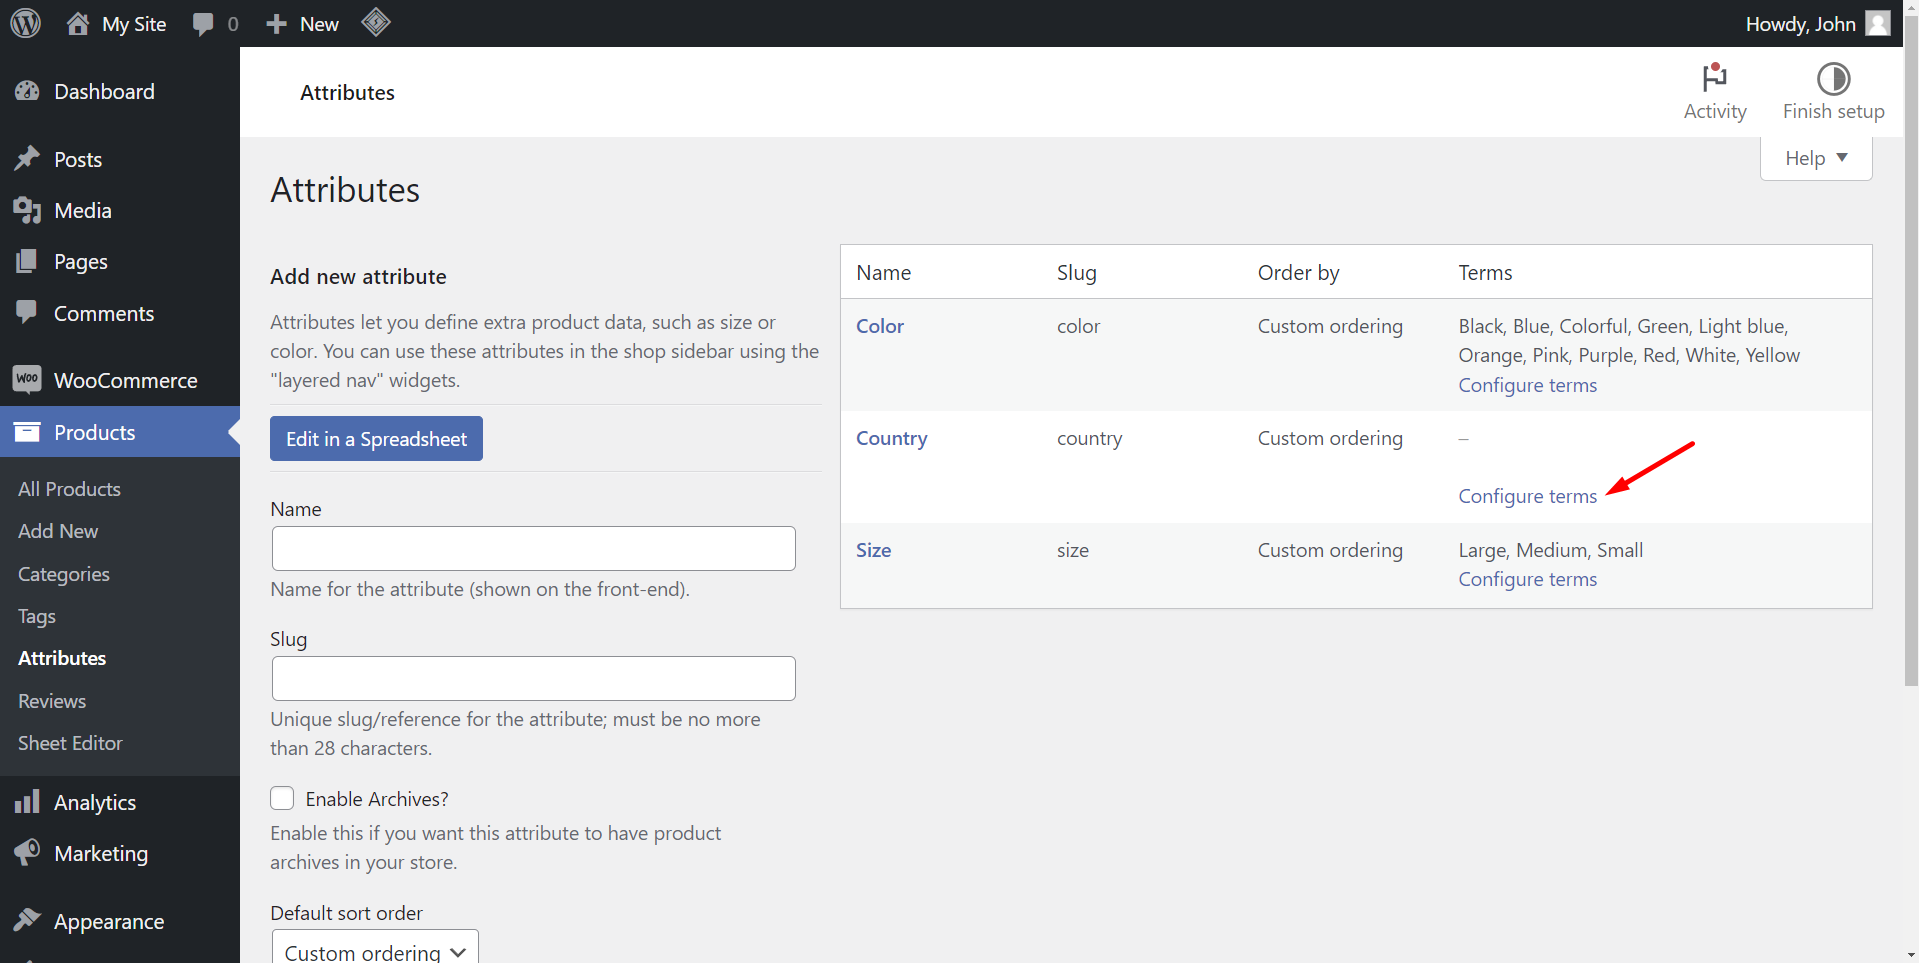
As you can see in the screenshot below, we have added an attribute term for every country and sub-continent we added in the global settings:
- South America
- Central America
- Mexico
- United States
- Canada
Step 4 – Set WooCommerce prices by country
Now you are ready to add prices by country to your WooCommerce products. For this you need to open or create a product.
Note – Make sure that your product is variable and that you create a variation for each term of the “Country” attribute.
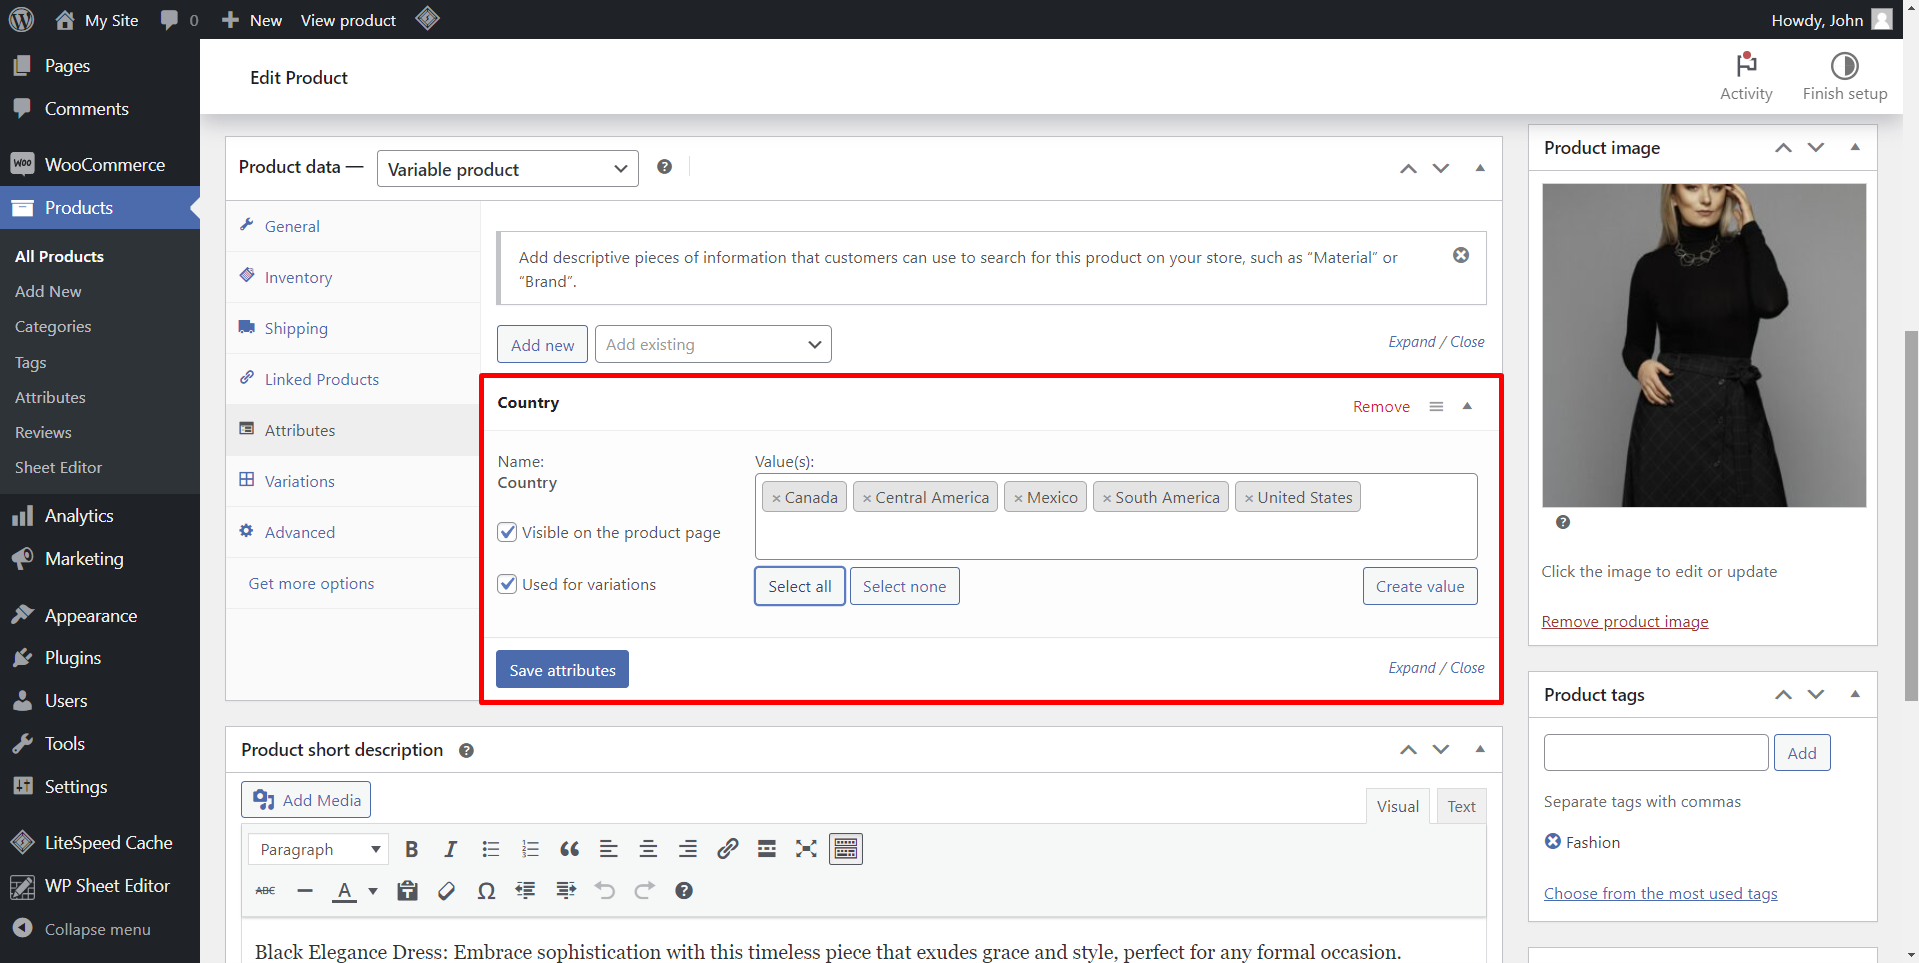
In the Attributes tab of your product data:
- Select the country attribute
- Select all the country terms
- Tick the Used for variations checkbox
- Click on Save attributes
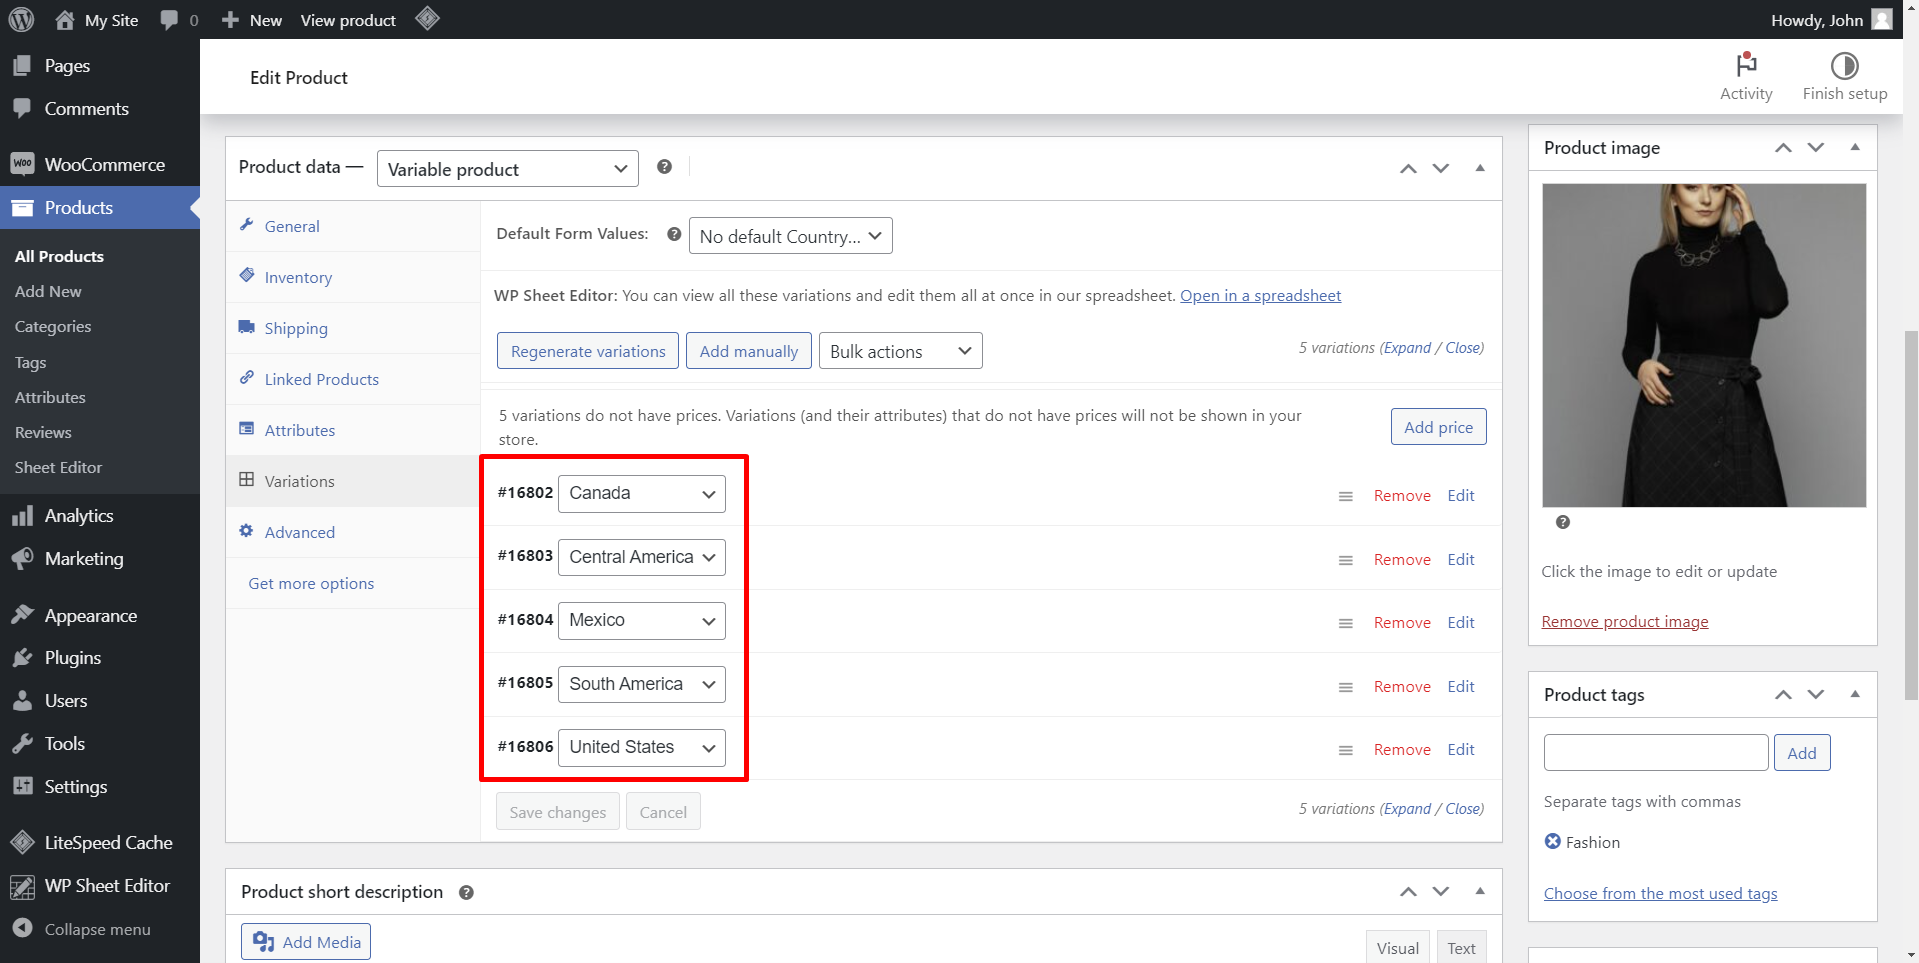
Move to the Variations tab and generate a variation for every country attribute.
As you can see below, we have added a variation for every country and sub-continent.
Now you need to add different prices for each variation and restrict the variation for the rest of countries, continents, subcontinents.
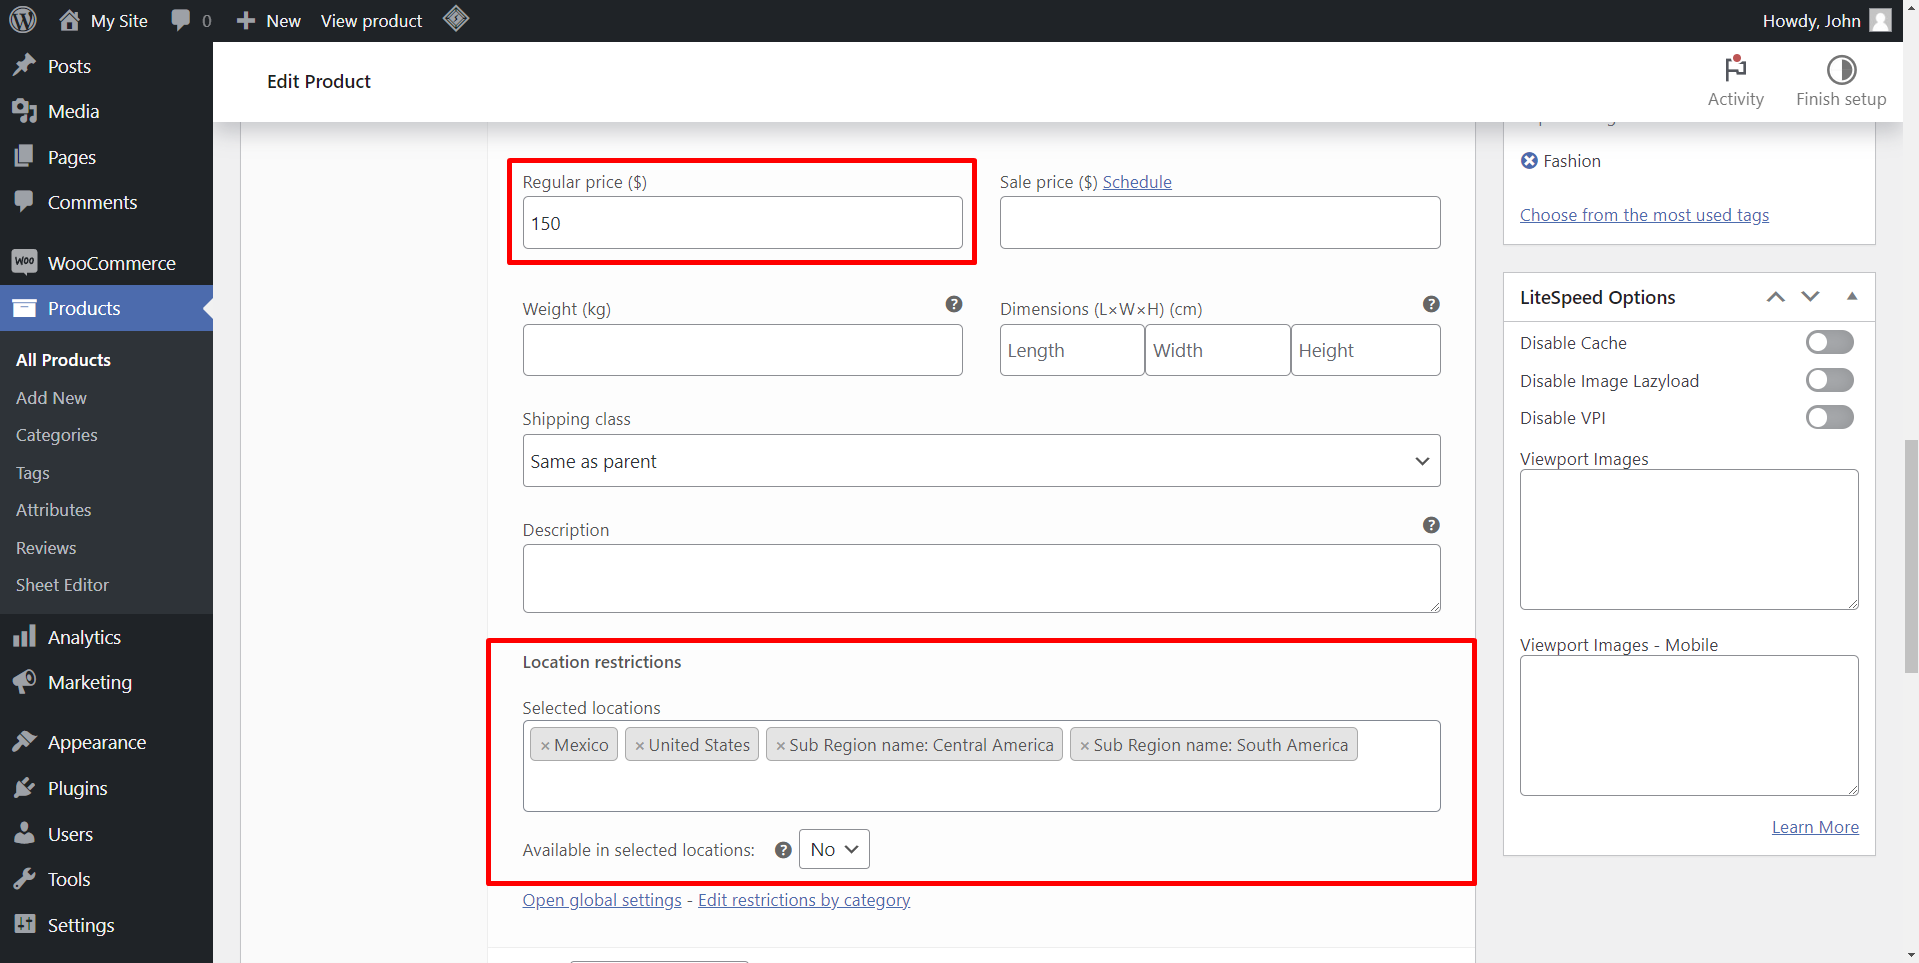
For example, let’s edit the Canada variation:
- Add the regular price
- Selected locations: Add all the other countries, continents and subcontinents. Note – Don’t include the variation country here. Example: If you’re editing the “Canada” variation, don’t include “Canada”. Include all other locations only.
- Available in selected locations: No
Now we can edit the Central America variation by following the same steps.
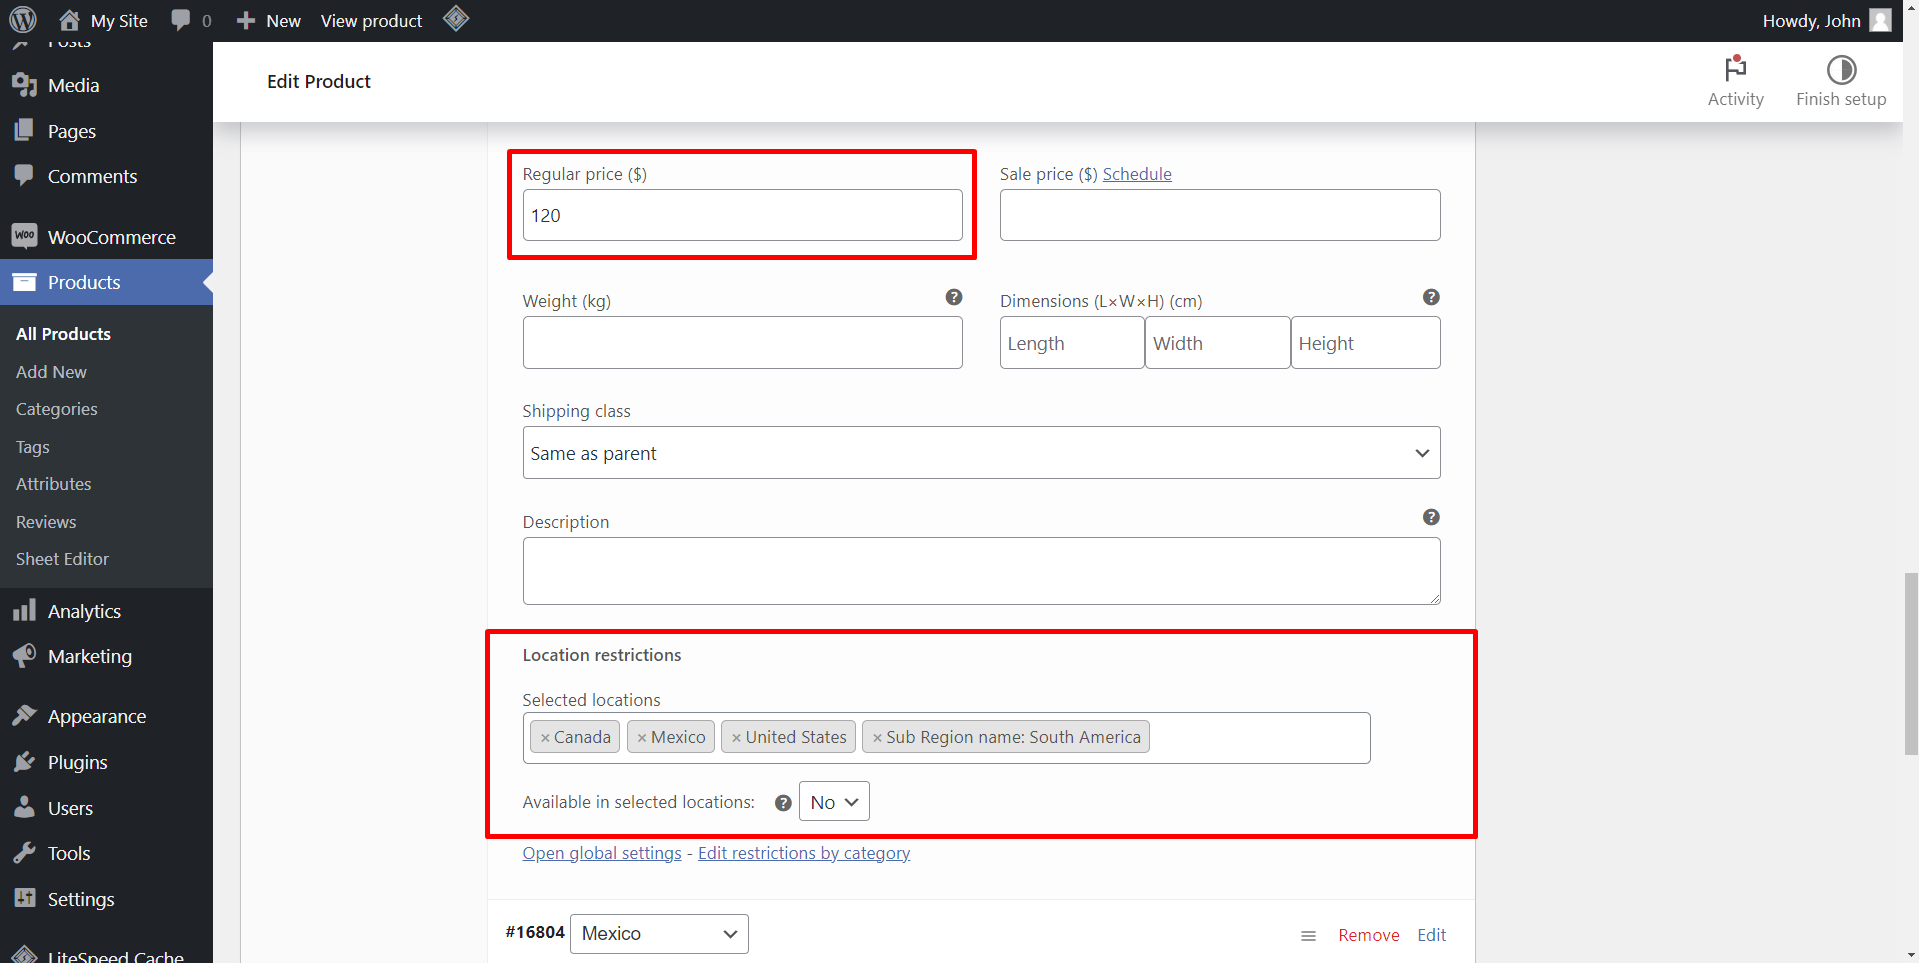
Once you finish editing all the variations, you need to save the changes.
Optional – Hide the “Country” attribute from the product page
When you create variable products in WooCommerce, the product page displays a drop-down field on the customer side, for you to select the attributes you want.
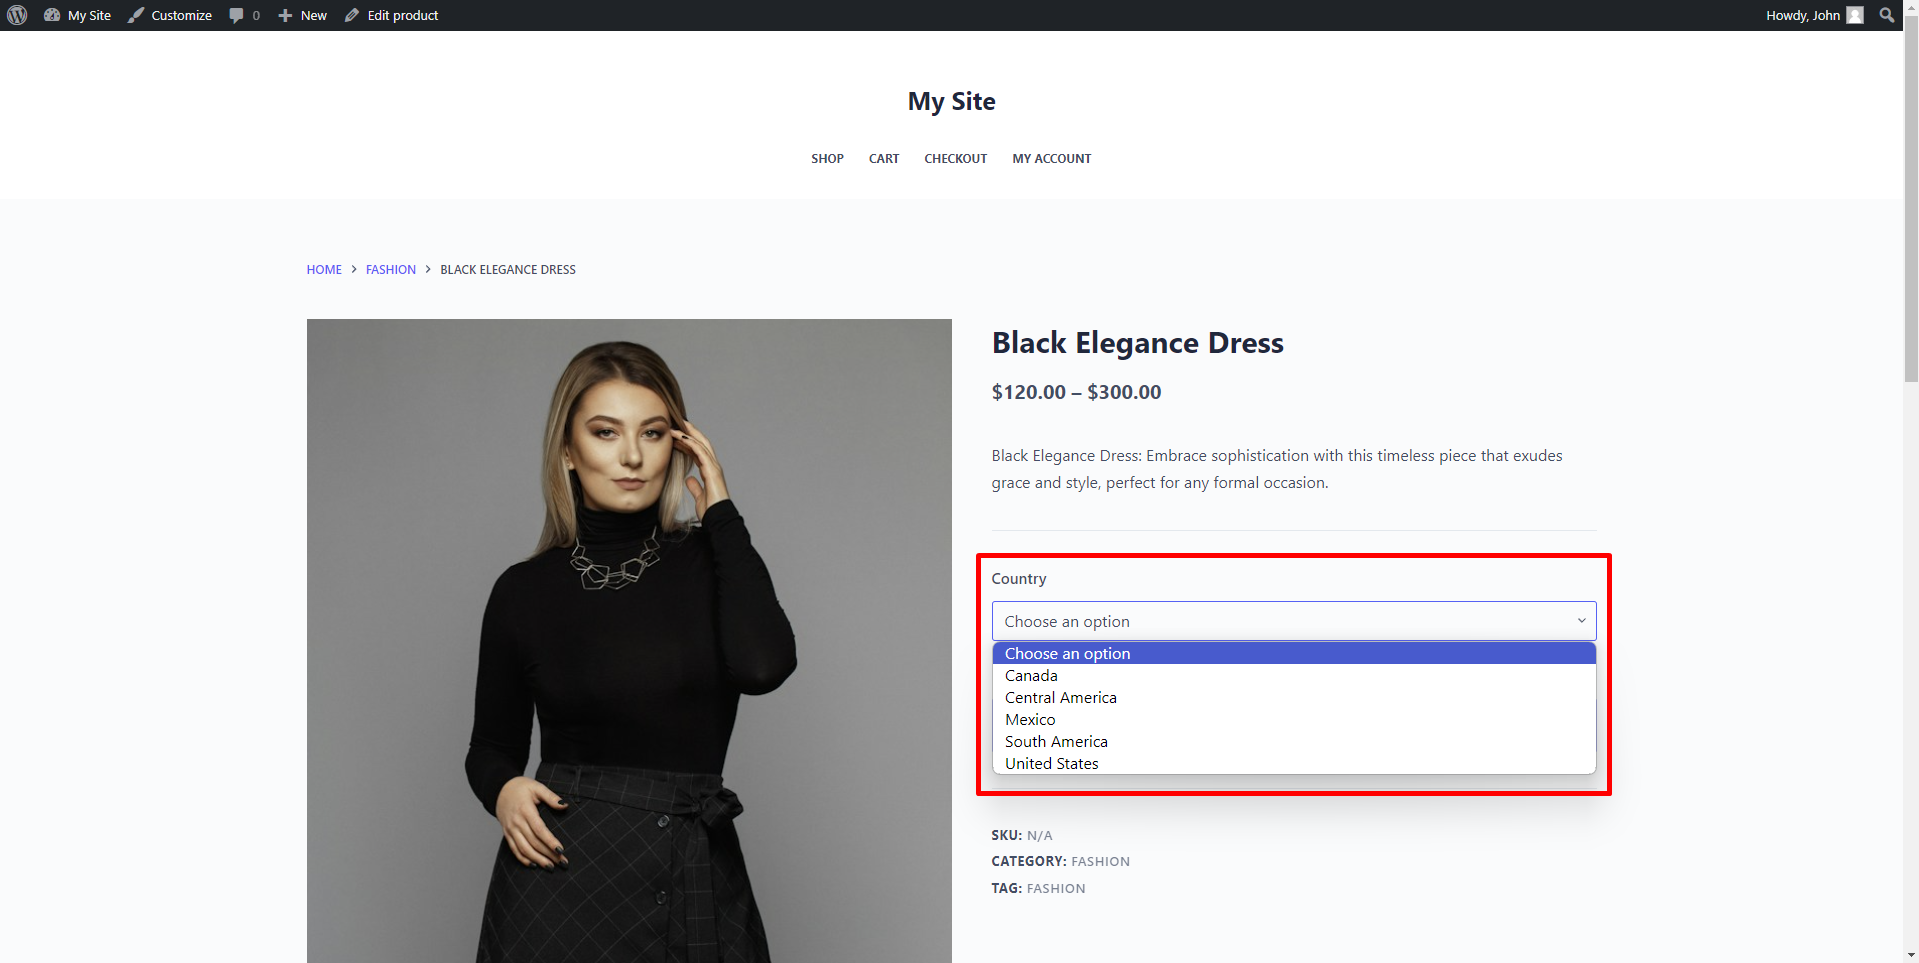
However, our plugin allows you to automatically hide the country attribute selector, so that your store automatically displays a different price, depending on the country or continent selected by the customer.
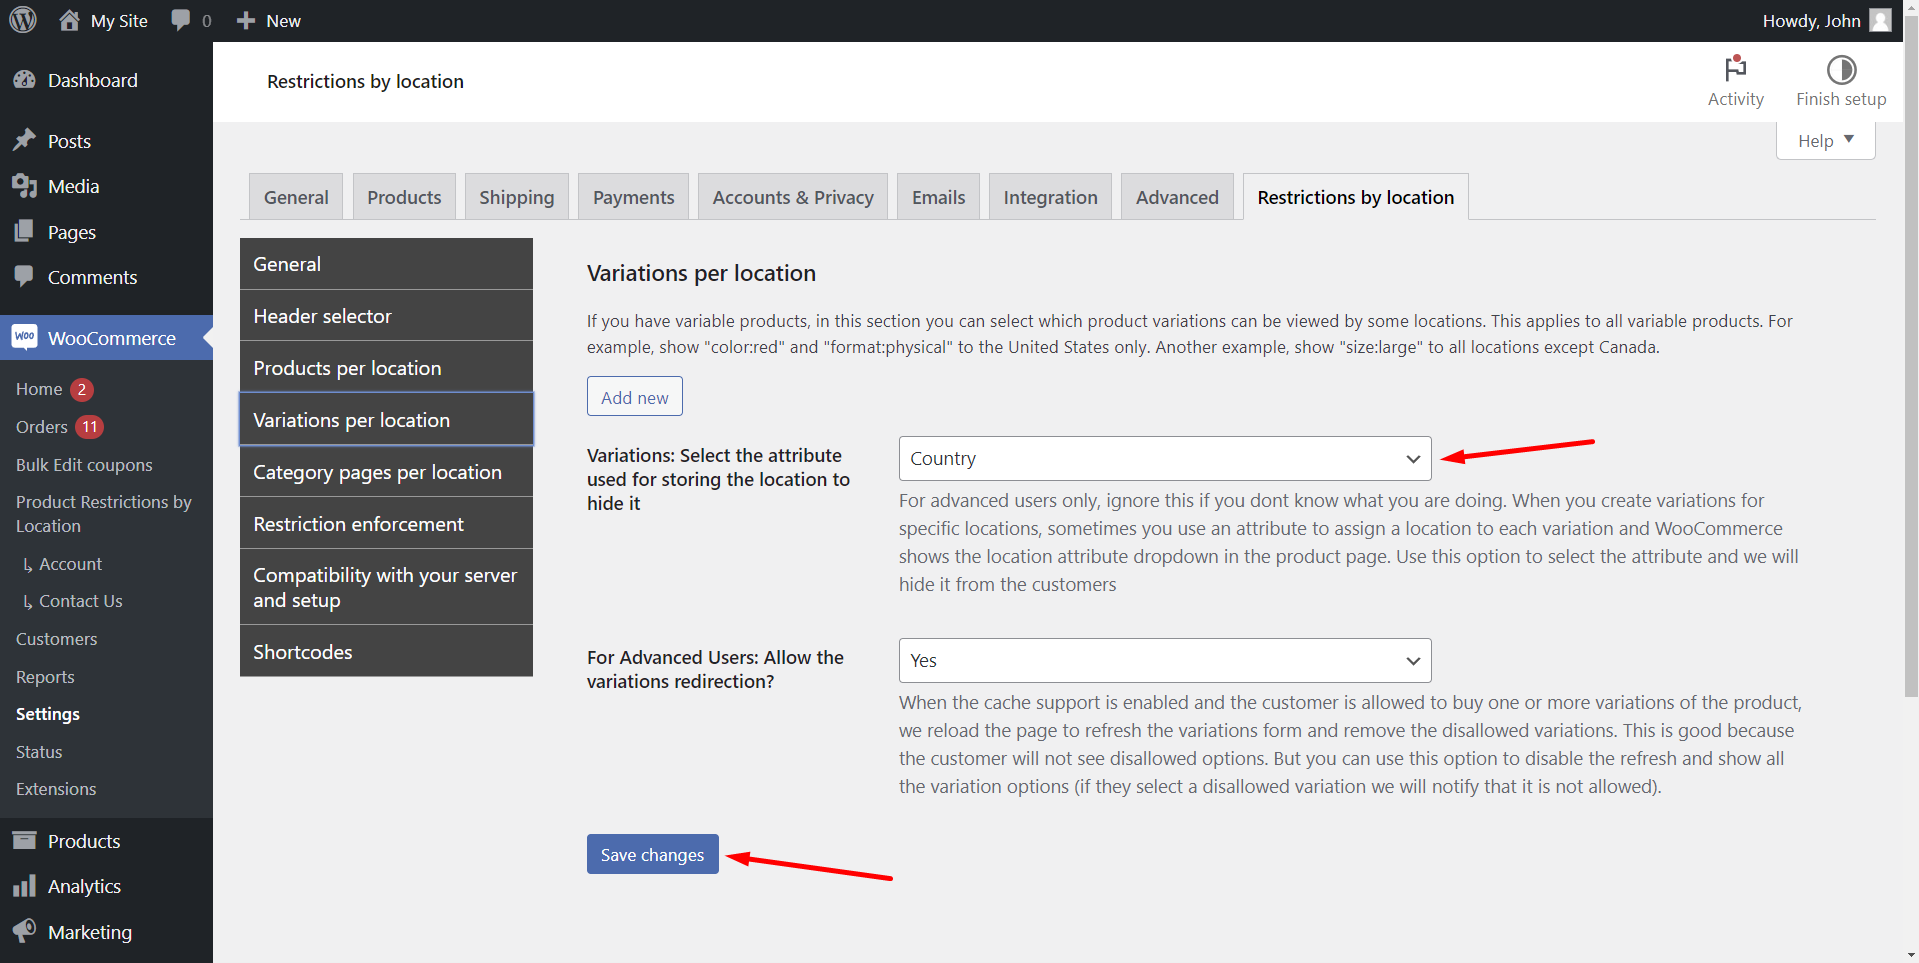
If you want to do this, go to WooCommerce > Settings > Restrictions by Location > Variations per location.
Now select these fields:
- Variations: Select the attribute used for storing the location to hide it: Country
- Click on Save changes
The result – WooCommerce prices per country
Our plugin allows you to get the country or continent of the customer in at least two ways.
First, you can display a popup when users visit the store. This popup can have custom logo and message, asking users to select their location.
The locations displayed on the popup will be the locations you selected in the global settings.
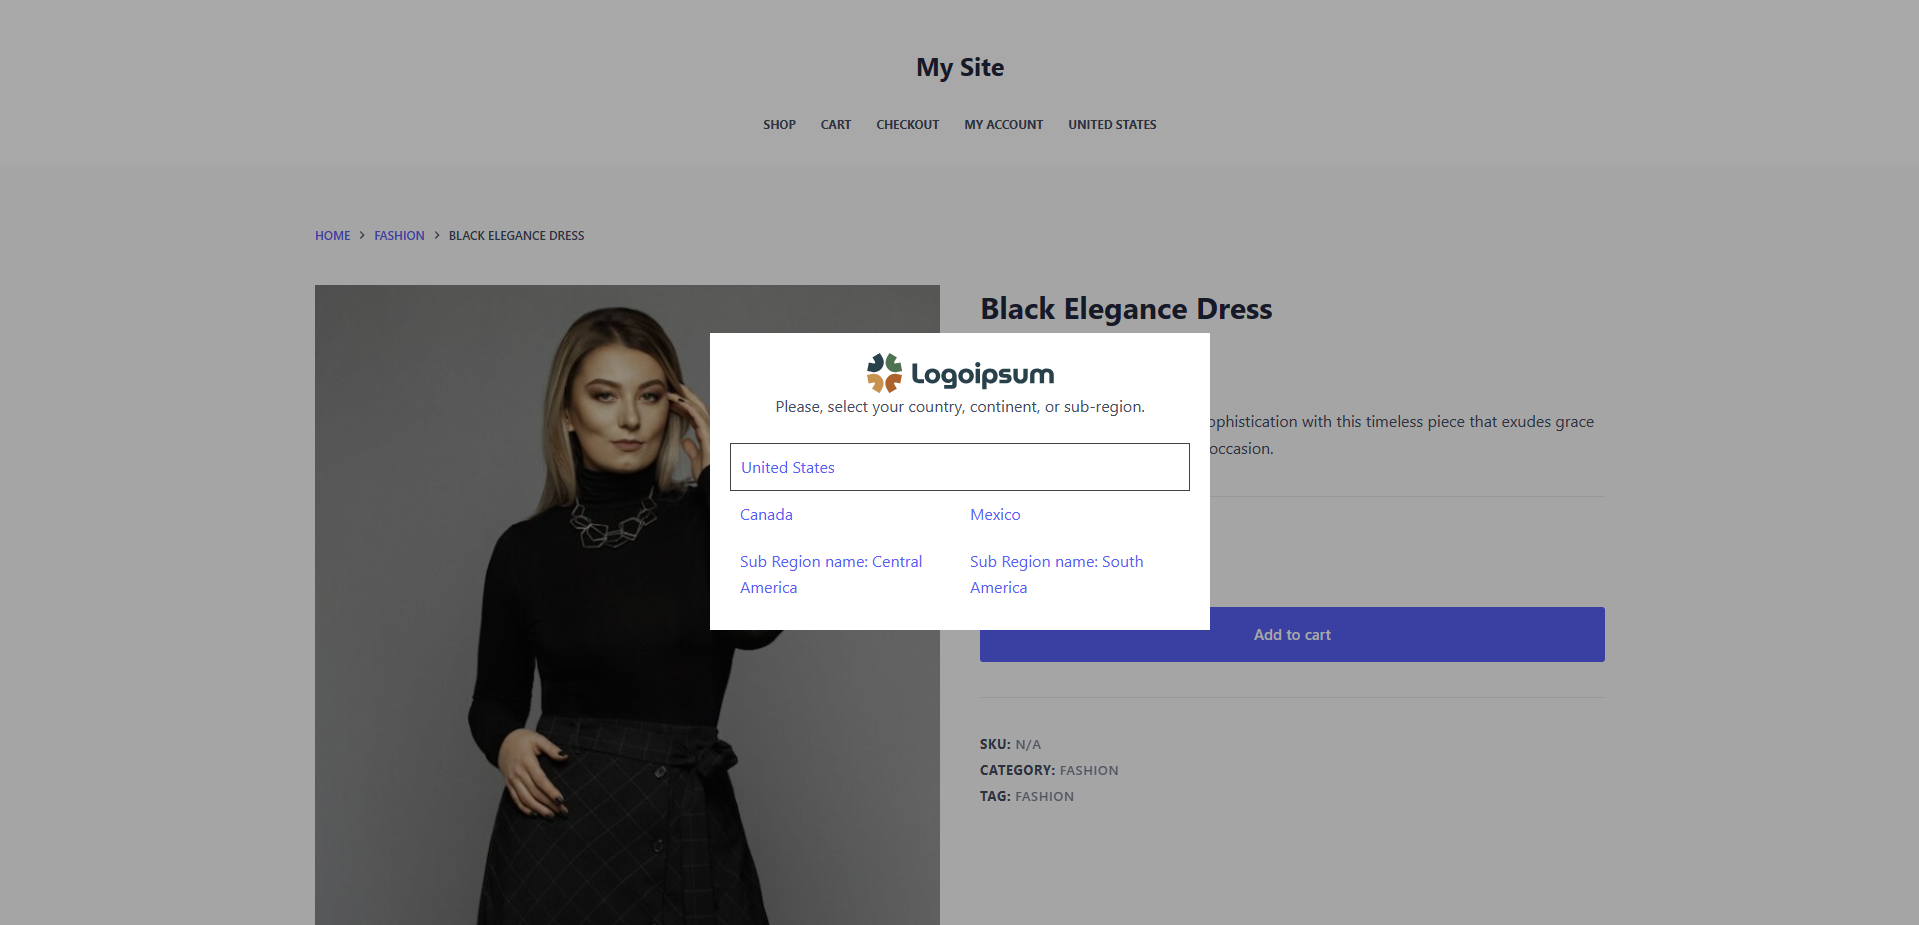
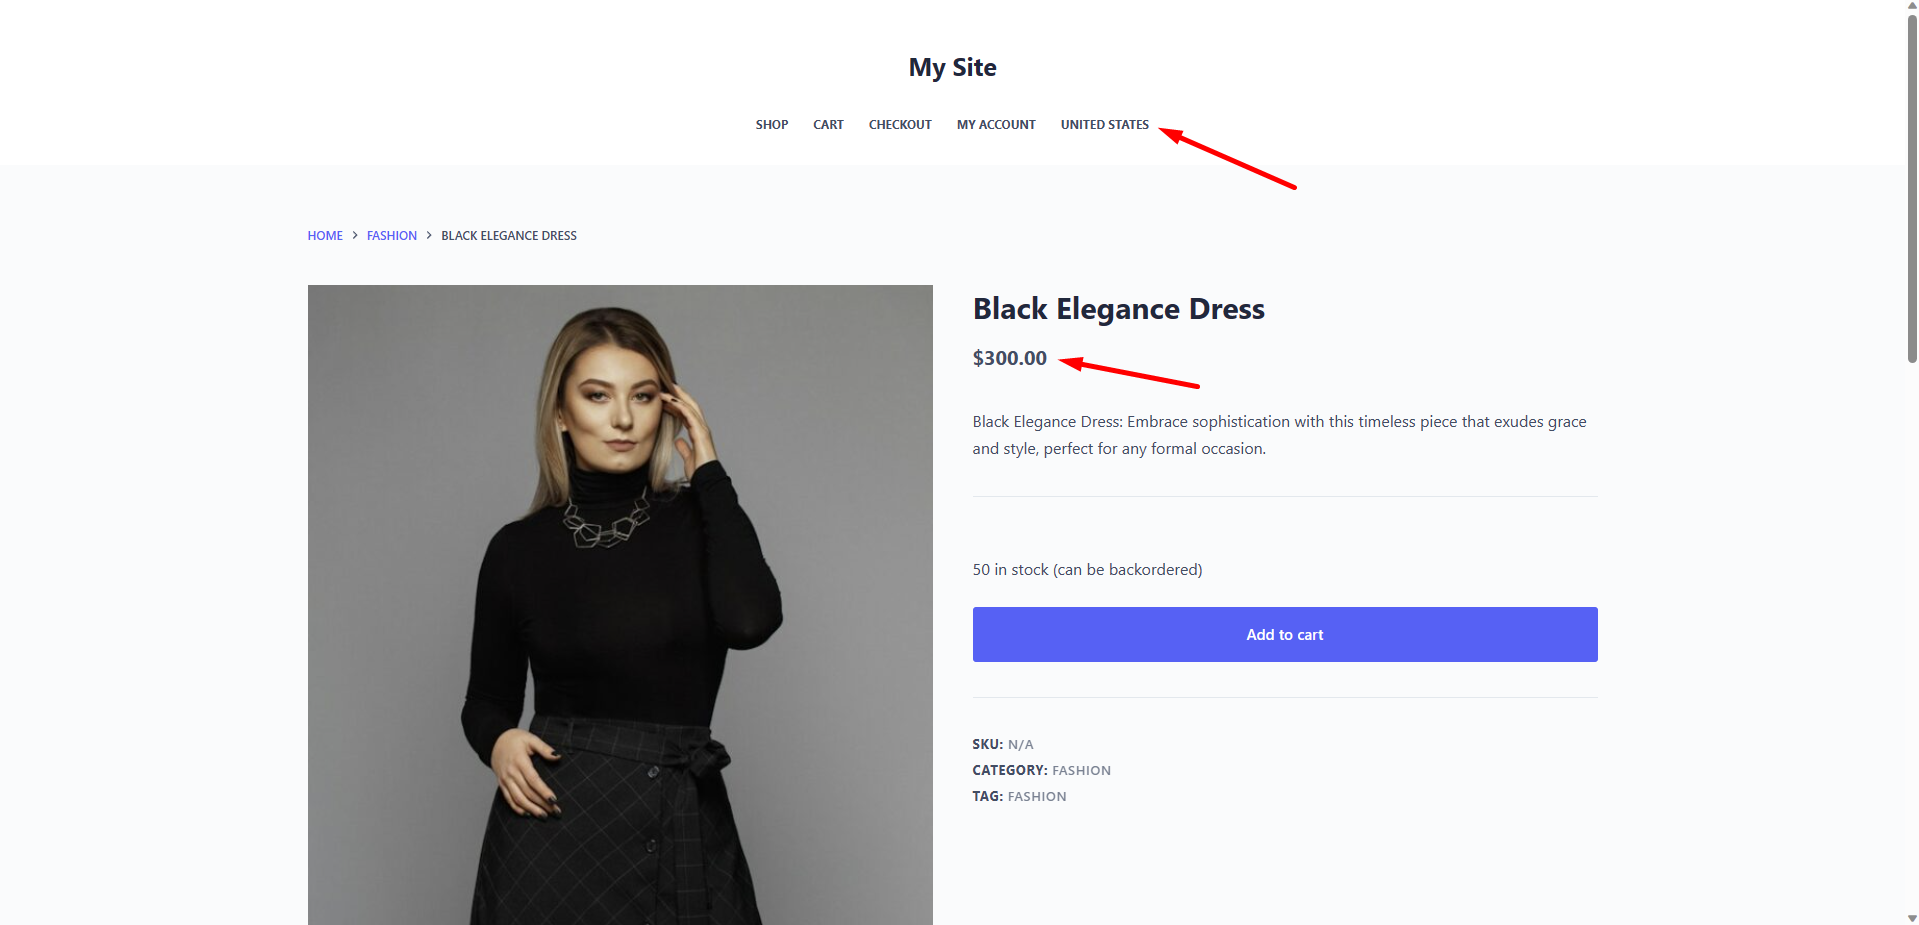
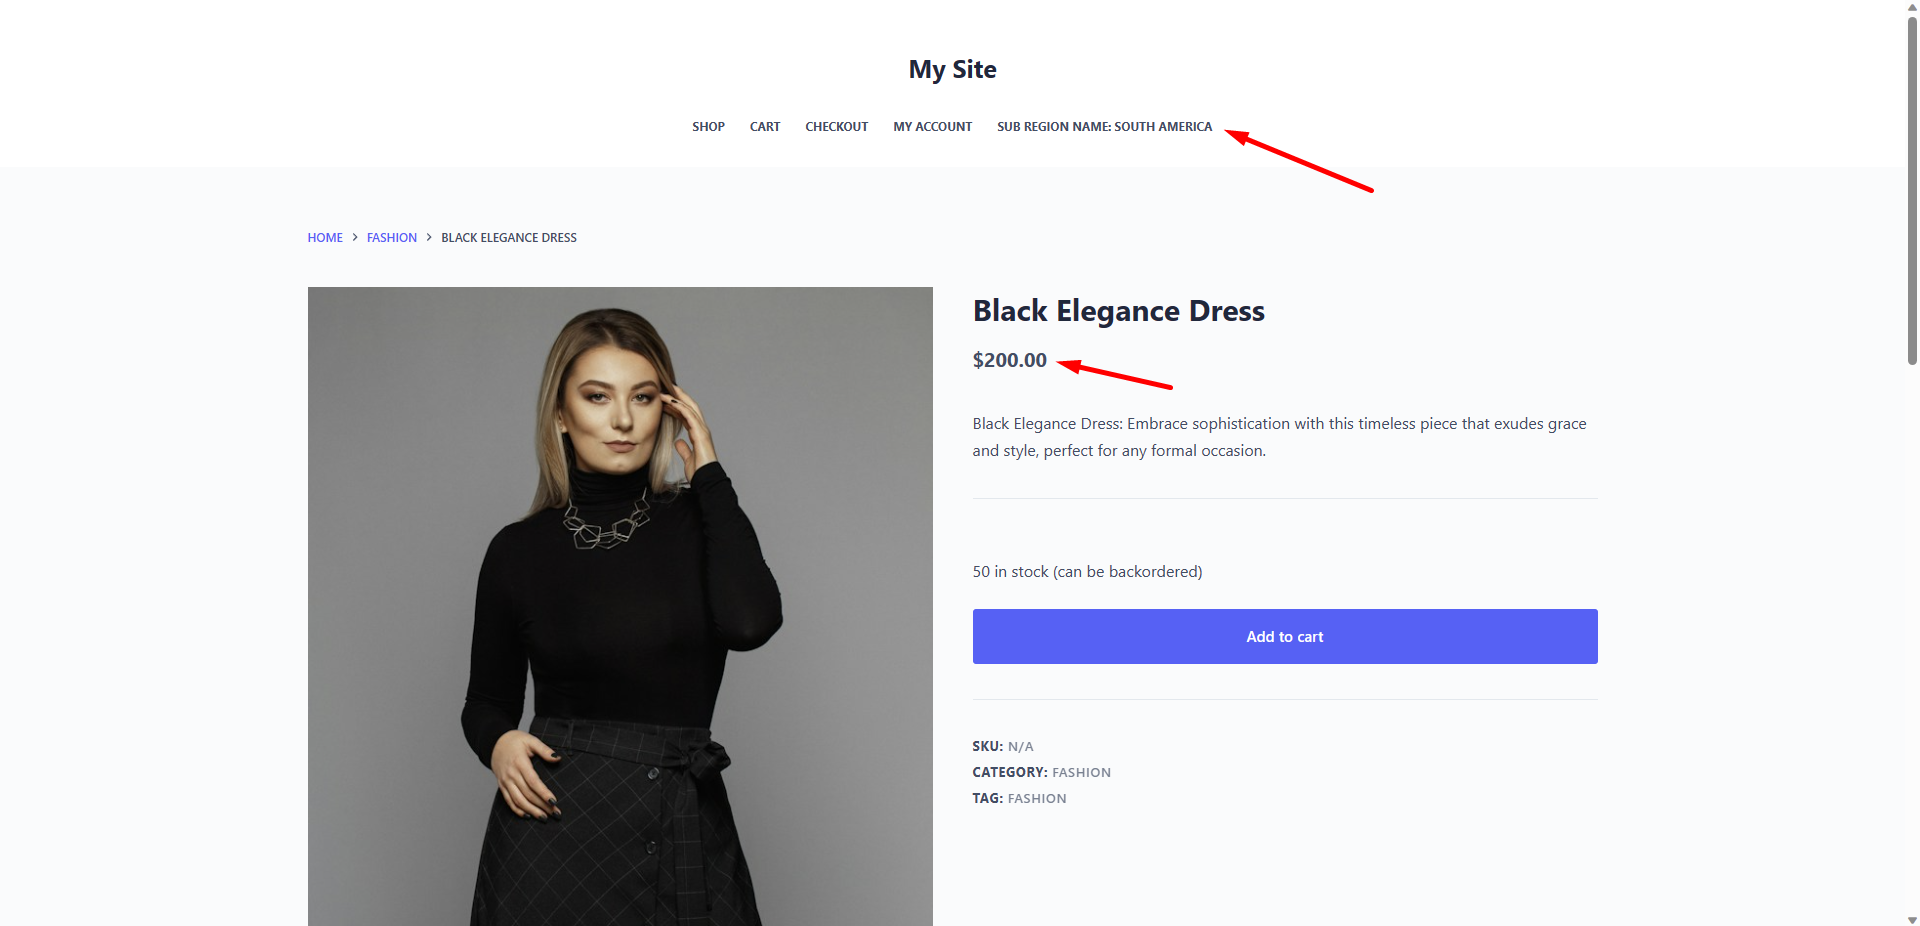
You can also display a dropdown country selector on any navigation menu.
As you can see below, we have selected the United States and the product price is $300.
However, if we select Canada, the product price is $150.

If we select Central America, the product price is $200.
As you can see, adding WooCommerce price per country is possible with the WooCommerce Product Restrictions by Location plugin. You can change prices based on the country by adding a variation for each country, continent or sub-continent.
If you want to create a store that sells products at different pricing for different countries, you can perfectly do it with the WooCommerce Product Restrictions by Location plugin.
You can download the plugin here:
Download WooCommerce Product Restrictions by Store Location Plugin - or - Read more